Friday 25 March 2011

SAFETY

It would be remiss of me to neglect saying anything about safety on a kayak. There are so many differing views on what you should or shouldn't have and wear etc but. At a minimum get yourself a good life jacket. Youre local marine Safety board will be able to point you in the right direction as to what you are allowed to have and where you must wear it..

The Victorian Marine Safety web site probably has the best write up on kayak safety in my opinion its well worth a look. Marine Safety Victoria
A couple of examples of jackets
There are so many different type of jackets out there. But if you follow the safety guidelines of the various state bodies you will be well on the way to selecting the correct rating jacket for where you are and what you want to do.
Part of safety also in my opinion is the have a paddle leash, you don't want that paddle floating off Also the old Be Seen Be Safe saying is a good one to remember..

Rod Holders

Now for one of the biggest things you will ever do to your kayak. Cut a hole for a rod holder.

The one thing i have to say about this is to measure 3 times and cut once. If you're installing a flush mount into the surface of the kayak you really need to make a template that the rod holder sits in perfectly. Then transfer the template to the kayak, mark it and cut it out carefully. Flush mounts come in angled and straight types.

Flush mount holder. 
 Here is a good link to fitting a flush mount Fit a flush mount

Surface Mount


 Mounting a surface rod holder like the one above is fairly easy. Find the place that it best suits things like your paddle stroke ( don't want a rod in the way when paddling ) also where you can reach it easily without having to stretch to far and last but not least, Is the place you are putting it strong enough, can you put a backing plate under it the strengthen the hull. There are many , many different types of surface mount holders out there. There is one that will suit your needs and budget, but you get what you pay for


Tuesday 22 March 2011

~*~ Paddle Holder ~*~

The next step once you have your leashes made and have them for what you need to put them on is to make yourself a paddle keeper/holder. There are a couple of types of these.
One way  is to use either folding or solid molded paddle clips As shown below.


Probably the most pupular type is one made out of bungee cord, 2 deck loops and a hook.
This is what i use and once you are used to it you dont even need to look to be able to get the paddle secured in it. You string the bungee with a loop on ech end into two deck loops and stretch it slightly. Then put the hoook somewhere that it will tension the cord when pulled over the paddle shaft to hold it secure, but not to tight as to make it hard to pull on.

Sunday 20 March 2011

Keeping it all on

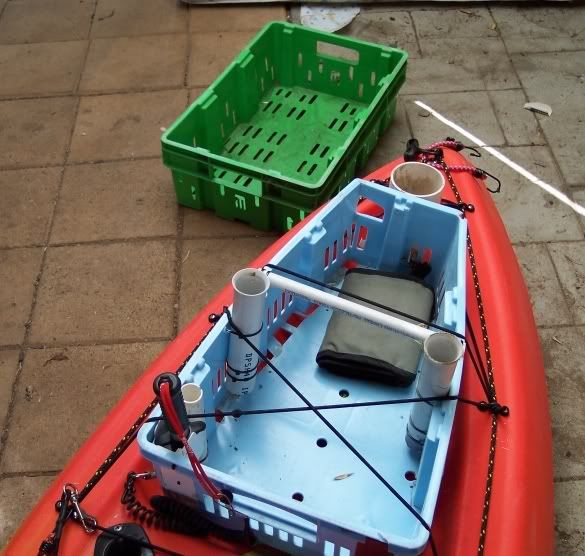
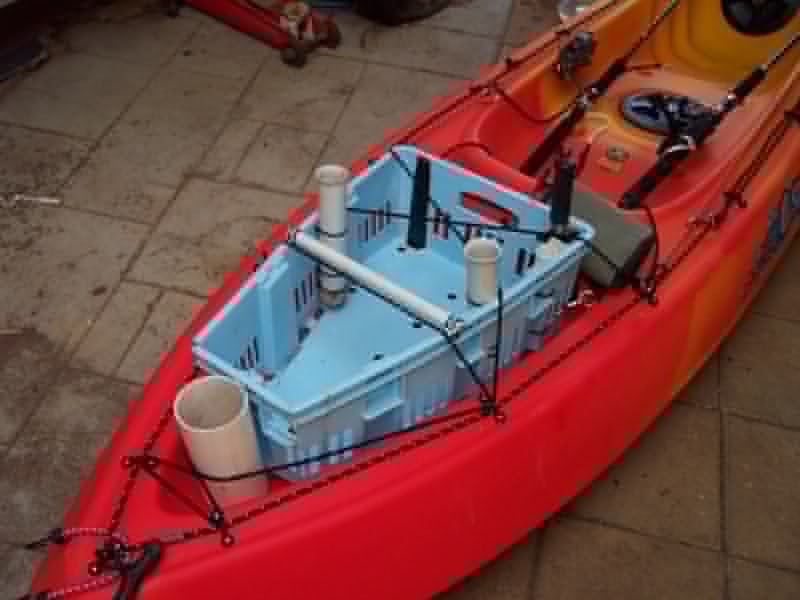
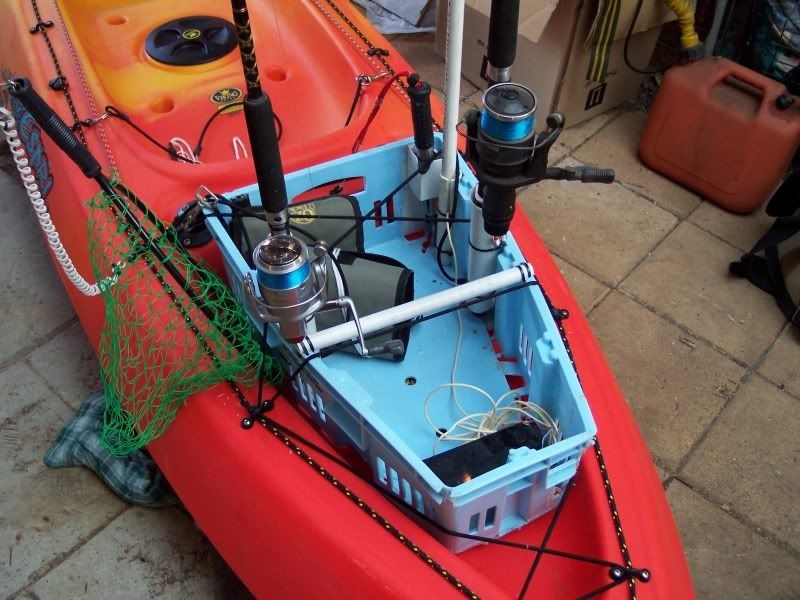
You've gone to the trouble of making things easy, a nice crate to hold the gear also. but what happens when the gear gets hit by a wave, it flips you or you flip yourself and every thing sinks to the bottom. The answer is  leashes for all your gear and straps/bungee to hold stuff in place.
 You need to tether everything you don't want to lose  to the kayak in some way. the answer to this is the rod, paddle, knife,pliers leash.
there are many different types and sizes but essentially it's just a cord tied to something at one end and secures at the other.
A couple of different types

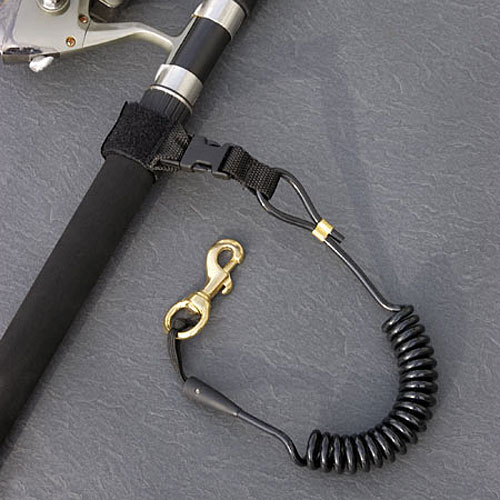
Above is a coiled lead , usually made D.I.Y from some phone line coil. The one above is nylon. the one below is a plain cord, many people make the leads with bungee cord , i used to but in reality its not going to spring back anywhere. normal cord is sufficient and cheaper
If you dont have one of these or something like it you will lose something that you didn't want to lose 
Making Leashes
Its really easy to go out and buy them, but when you have about 10 or more on the kayak with you at 12-20 dollars each they can get expensive. I have up to 4 rods, pliers,tackle bag, knife, sponge, anchor reel, tackle boxes etc. When you add them all up it would come to alot of money. The main one i would buy though is the leash for the paddle, most are very sturdy and have a three way velcro securing strap.

If you want to make them , they are very easy.
Its just some 4 mm cord with a cheap dog leash snap on one end tied with a double knot and a more flexible cord on the other that wraps around the rod handle. Any type of snap will do other then the type shown, i have a few different styles. The one in the picture is cast alloy but the best are brass and last for ages. As long as you keep them oiled with crc or similar then they are pretty good and don't corrode much.

First off this one is made with bungee as the main line and a soft cord as the loop for the article to be tethered.
Make a loop and thread the two ends of the soft cord through it. Its held together with a small cable tie to keep the ends together of the bungee.The bungee could just as easily be normal cord as in the picture above


Wrap around as shown

Loop over the cord and under the bungee

Pull it tight

Put a dab of super glue on or use hot glue, cut to tidy up the ends and use heat shrink over it.

This one has a compression clip on it, the bungee pushes in and then the sleeve pulls down pushing the barbs into the cord. Its a very secure join, but ive used super glue on it as well

That's how easy it is to make a leash for anything you want to attach to the kayak.

Setting Up

The Espri has a rather large rear well for the size kayak it is. I don't think the designer thought about what a full on fishing kayak it could be but with a well like that the scope for carrying "stuff" in the rear was huge.
 
One problem "how to keep everything in place and well organised". You dont want it all slopping around the back and over the sides.
The answer is a crate. Many use a square plastic milk crate, i had that for a while but found it was to high and really didn't give easy access. Everything was too cluttered together. That partly could have been because of the lack of experience at that time but it was annoying.
Then one day while at work i saw two plastic crates that hold frozen chickens, they were low and long, I grabbed them as I thought they would be perfect.
As you can see the rectangular shape will no fit the rear well , so it had to be modified. This was done by cutting the shape out in paper, tipping the crate over, marking it and cutting it out.
Cut out and and almost done. Its joined by cable ties and the small bit of plastic you see bridging the gap has been melted together with a soldering iron, got to be careful not to burn your fingers though
The tube across the crate is for strength. once it was done it was time to put it in the kayak and trial how things were to be setup. There is no right or wrong way to do this , it's basically what suits you.
Rod holder tubes made from 4omm pvc pipe, heated and flared on the ends for the rods. The tube at the rea is for the anchor and other tubes to hold a knife, grippers and smaller ones were added later as lure tube to hold hard body lures for trolling. I also laced bungee cord criss cossed over the well that the crate went under to hold it in there.
This picture also has the battery and navigation/anchor light in it as well. So youre able to keep the crate in , but what holds everything else onto the kayak?


So What's Next - Making Things Easy

Ok, so then i thought about how to get the kayak on and off the car. it's all great to be out on the water , but how do i get it there and back , on and off the car easily, well easier. The last thing you want when you have decided to get into kayak fishing is to make things harder when its supposed to be easy.
Make a loading bar is how.
 The bar i can up with is very simple and hooks onto the existing racks.There are so many variations out there, it's about making one to suit your needs


All it is , is a simple round bar of light tube steel  with two curved flattened pieces bolted to it allowing it to hook around the cross bar.


All you need to do is rest the front of the kayak on the bar, lift the back and move it onto the roof rack. then move the front on , take the loading bar off and tie down the kayak ready for the trip
  
  
All it is , is a simple round bar of light tube steel  with two curved flattened pieces bolted to it allowing it to hook around the cross bar.

The first step into kayak fishing

I have really no idea what first got me interested in fishing from a kayak. id always fished from my boat and had done for well over 15 years, both fresh (Nagambie) and salt around the Point Cook, Altona, Corio Bay areas. Through this blog Im going to run through a full description ( or try to) of my journey from the start to now. Including all my modifications and ideas along the way.

After a while of looking around i decided on my first kayak, the Viking Epsri.


At 3.5 meters long and around 20 kilos in weight it seemed the perfect sized kayak to start my kayak fishing /exploring adventures. It turned out to be a fantastic choice, however the rrp of 1100 dollars was sort of rather high. Mine cost about 700. Then it was time to go and have a paddle, the first paddle i had on it was early in the morning around Princess pier in Port Melbourne.

Then it was time to take it fishing. i remember taking one rod out laying across my legs with a soft tackle bag in the rear well with my gear. The first fishing trip was out at Campbells cove Point Cook To say i was more than happy with the outcome was an understatement. Some nice flathead was the first catch on the little kayak. It was easy to handle and easy to paddle.
Wow this kayak fishing does work and is fun, time to start to pimp the kayak to make it a more user freindly fishing machine.......